fbpx
Rainbow Six Siege Azami Operator guide Vector art by r6siegecenter

PROs:

  • Powerful gadget in right hands
  • Good weapons
  • Flexible playstyle

CONS:

  • Unique gadget requires game knowledge

AZAMI

Defensive operator

Azami is one of the most creative defenders we have received in a long while!
Her unique Kiba barriers offer many possibilities in terms of usage – both in placement flexibility and the advantage provided to the defensive team.
 
Year 7 first defender also comes equipped with good loadout options.
Azami is a great operator for players who like experimenting with angles and adapting to situations during the round.

Organization

RAINBOW

Availability

DLC Y7S1

Armor Rating

Medium

Speed Rating

Medium

Biography

Raised in Kyoto City, Azami blurs the lines between the ultra-modern and the traditional. Boxed in by the rigid rules of her household, she found outlets for self-expression through fashion and physical combat. Her focus and determination allowed Azami to progress quickly through the ranks of Aikido. This aptitude, as well as her dedicated study of languages, served her well when she moved to Tokyo to study at the Metropolitan Police Academy.

While working as a motorcycle officer Azami gained her 3rd Dan in Jujitsu and her 5th Dan in Aikido, earning her a spot in the Security Police division of the TMPD. She fell out with her sensei after failing to achieve the serenity necessary to progress. 

OPERATOR VIDEO

After facing suspension due to multiple violent outbursts in the line of duty, she subsequently chose to join the private sector as a bodyguard. Azami worked exclusively for Masayuki Yahata in Fukuoka before his death led her to re-establish contact with Yumiko “Hibana” Imagawa.

Operator guide

Detailed information on how to play Azami

Utility

What is aZAMI'S utility?

What is the role of Kiba Barriers?

Kiba Barriers are unique gadgets of the first operator released in Year 7 of Rainbow Six Siege – Azami. They are kunai blades, but with a big twist – they are not weapons, but tools!
As a tool in Azami’s bag, Kiba serves a few roles, such as:
  • area denial
  • delaying push
  • creating new lines of sight

Kiba Barrier characteristics:

  • 5 Kiba available per round
  • Azami starts round with only 1 available Kiba
  • Deals only 5 damage when thrown at an enemy
  • 30 seconds replenish cooldown for each Kiba
  • Kiba barriers attach to surfaces just like Ela’s Grzmot mines or Thorn’s Razorblooms
  • Kunai can attach to another deployed Kiba barrier to expand the covered area
  • Azami’s barriers are not retrievable once deployed
  • Kibas are bulletproof and not transparent (from both sides)
  • Azami’s unique gadget can be destroyed with either explosive damage or 3 melee hits
  • Melee hits create visible cracks in the barrier
  • Barrier’s range is circular 2 meters radius
  • Kiba has no duration limit. The barrier remains until destroyed or end of the round
  • Placing a default barricade on top of Kiba will destroy the barrier (applicable on windows and indoors)
  •  

How to use utility?

Kira Barrier placement principles:

How you decide to place your Kiba barriers depends on many factors. Here are some of the questions you should ask yourself when deploying a kunai:
  • What is the angle that I block/create?
  • What is the role of this barrier?
  • Can enemies get in melee range safely and easily?
  • Am I not hindering any of my teammates?
  • Does this placement fit our team’s strategy?

Potential Advantages of Kiba:

  • Blocks lines of sight
    Doing so adds an additional protection layer by eliminating certain angles. Thus serving as a tool to create extra safety for you or other defenders.
    Rainbow Six Siege maps offer a lot of angles. One of the ways we judge the strength of a defensive position is the number of angles the defender is exposed to while holding that spot. This is where Kiba’s come extremely helpful. You can cut off certain angles to lower the number of angles you have to worry about. Enemies can, of course, destroy your barrier, but doing so will notify you about the impending danger.
    Or Say you saw/heard shots coming from a window nearby. You can block that window with your Kunai to make it more difficult for enemies to kill you.
     
  • Surprising enemies with new angles
    A more aggressive way of playing Azami is to create angles that will be unexpected by enemies or will provide you with a tactical advantage.
    Two main usages come to mind immediately:
    • Creating a line of sight on enemies’ feet indoors
    • Establishing tight angles between the barrier and another surface
 
  • Delaying attackers’ push
    Azami’s Kiba barriers can also serve as another layer to slow down enemies’ push.
    You can place barriers in entry points to the objective or chokepoints to force enemies to risk life or spend their utility.
    Such placement of your trap works best if combined with other defensive utility, especially Jager or Wamai. They help secure the safety of nearby barriers.

Be creative with angles

As the community plays around with Azami, we will see exponential growth in the number of creative angles available online. But don’t rely only on Youtubers and other content creators to provide you with good angles. 
There are three layers of development as a player (both in e-sports and traditional sports):
  • Education – this is where guides such as ours come in handy
  • Emulation – choosing players/content creators who inspire you. Basically, “Who do you want to learn from?”
  • Experimentation – once you have gone through two previous steps, you should put theory to practice. Try to think as your favorite player would. Use the ideas from guides in an in-game scenario.
So be creative. Experiment! Think outside of the box, as they say. 

Interactions

SYNERGIES

Azami benefits the most from other defensive gadgets that help secure her Kiba barriers. Two specialists in Rainbow Six Siege fill in this role expertly:
  • Jager’s ADS
  • Wamai’s MAGnets
Both gadgets, when placed nearby, can protect Kiba from enemies’ explosives.

Counters:

Azami is not a counter to a particular operator or gadget in Rainbow Six Siege. She is, however, capable of countering angles.

Countered by:

  • Explosives
    Ash Breaching rounds, frag grenades, and other explosives will immediately destroy Kiba barriers
  • Melee
    3 melee attacks destroy deployed barrier
  • Sledge’s hammer destroys barrier in one hit.

How to play -
Azami

Playstyle

Azami is a 2speed & 2armor operator who can fill in both roaming and anchoring roles on the defense. Thus, we classify Azami as a universal operator.
Her gadget can be pre-placed but is best used actively during the round. As a result, my personal choice with Azami is to stay more as an anchor. This is because Azami can adapt to the unfolding situation and deploy her Kiba barriers depending on the attackers’ approach.
 
Roaming is leaving the objective site to disturb and flank attackers.
On the other hand, anchoring means staying on the objective. Or alternatively, in a location with eyesight to the objective.
To learn more about each defensive role, please visit the below sections.

Difficulty

MEDIUM
  • Azami’s utility is simple mechanically
  • Requires game sense to understand tendencies and situations around player
  • Gadget’s effectiveness scales proportionally with the map knowledge of the player

Loadout guide - Azami

Available options

Primary weapons

Secondary weapons

Universal gadgets

Impact Grenade

A grenade exploding on impact. It is primarily used for opening holes in surfaces.

barberwire1

Barbed Wire

Razor wire that can be placed on flat surfaces, which slows down attackers movement speed and creates noise.

Loadout suggestion

Loadout choices are an individual aspect, and rarely there is a “go-to” loadout in R6 Siege.
Sight choices are purely personal and depend on the player’s playstyle, map, even objective & specific role.
Please treat the below suggestion as what it is – our preferences.
We encourage you to experiment to find your setup.

Remember, just because something works for someone else, does not mean it has to and will work for you!

Suggested loadout:

Primary weaponBarrelGripScope
9x19VSNCompensatorVertical GripReflex B
Secondary weaponBarrelGripScope
D-50Muzzle BrakeN/AN/A
Gadget
Barbed Wire

Why such loadout?

PRIMARY WEAPONS

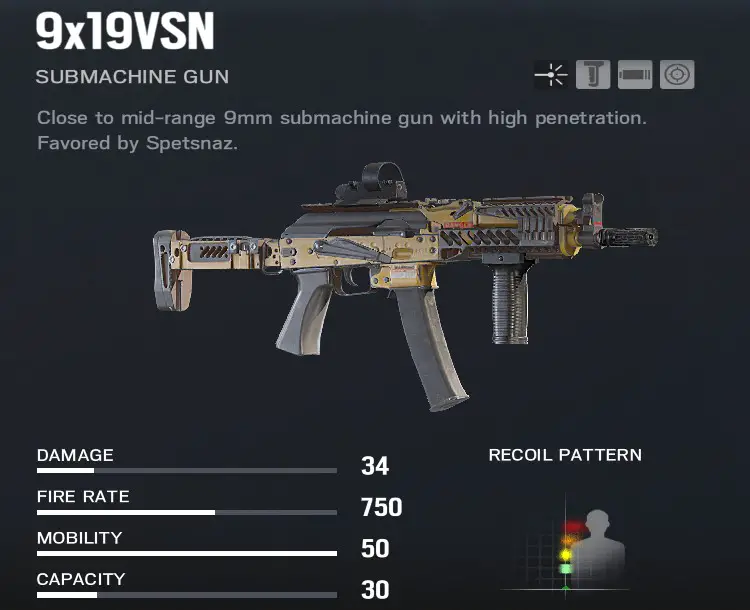
9X19VSN is a very reliable automatic gun. We prefer to use automatic weapons over shotguns due to their flexibility in various situations and ranges.
The recoil of this SMG is relatively low, especially the vertical one. We recommend using a compensator as the gun starts to pull stronger to the side with longer bursts. 
If you feel comfortable with the gun’s recoil, try using an angled grip. Otherwise, equip a vertical grip to lower the recoil of the weapon.
Azami’s SMG was not granted access to magnifying scopes, so pick the 1x sight of your preferences – our top choices are the Holo A & Reflex B.
 

SECONDARY WEAPONS

Azami does not offer any choices for secondary guns – we can equip only D-50. But no reason to worry. This pistol is a beast!
Use D-50 with a muzzle brake. It will offer a reliable alternative when you run out of bullets on your primary weapon!
You can use your pistol to create holes in the environment thanks to its higher caliber destruction than other pistols!
 

UNIVERSAL GADGETS

Both universal gadgets work well for Azami. Thanks to their benefits, I find myself using more barbed wires on most defenders.
Barbed wires are an excellent option for slowing enemies down, especially in choke points or entry points.
 
However, we need to point out that Azami’s unique utility synergizes well with Impact grenades. She can use an impact to destroy her Kiba barriers quickly.
Doing so can be used strategically to get a jump on unsuspecting enemies.

Community Videos -
Azami

Other operators

Learn more about other operators in R6 Siege!

Or go to list of all available Guides

Found our website useful?

Be the first to know about new content!


The Only 
Guide You’ll Need

70+ Pages of Exclusive Content

14-Days Money-Back Guarantee!